App Store: Google Cloud
Описание
The app helps you manage your services running on Google Cloud directly from your Apple iPhone or iPad:
• Stay connected to the cloud and check billing, status, and critical issues.
• Create your own custom dashboard to produce an overview of your Google Cloud services.
• Monitor the state of your Compute Engine and App Engine resources with the ability to SSH into your VMs.
• Access to Cloud Shell to perform any Google Cloud (gcloud) operation.
• View and respond to incidents, errors, and logging.
We plan to ship new features regularly and continually improve your user experience. Please give us your feedback in the app by tapping the menu button in the upper-left corner, selecting Help & Feedback, and then Send feedback.
Версия 1.19.1
• Improved Billing tab for better readability.
• Bug fixes and other improvements.
Оценки и отзывы
Оценок: 16
Good but too limited
Is there are any plans to support google kubernetes, networking and other services?
SSH Bug fixed
SSH client has no ability to scroll, so if the output is larger than screen, there is no way to see it. In addition, command input is constantly being overlapped by the keyboard, absolutely unusable.
Well done!
I wonder did they ever try to use it themselves before realising this.
*UPDATE*
I confirm, that developer fixed both bugs described here in new version.

Thanks for your feedback. We have fixed scrolling issue for SSH/Cloud Shell in latest release.
Cannot change account
How to sign in to another account?
Разработчик Google LLC указал, что в соответствии с политикой конфиденциальности приложения данные могут обрабатываться так, как описано ниже. Подробные сведения доступны в политике конфиденциальности разработчика.
Связанные с пользователем данные
Может вестись сбор следующих данных, которые связаны с личностью пользователя:
- Геопозиция
- Контактные данные
- Пользовательский контент
- Идентификаторы
- Данные об использовании
- Диагностика
- Другие данные
Не связанные с пользователем данные
Может вестись сбор следующих данных, которые не связаны с личностью пользователя:
Конфиденциальные данные могут использоваться по-разному в зависимости от вашего возраста, задействованных функций или других факторов.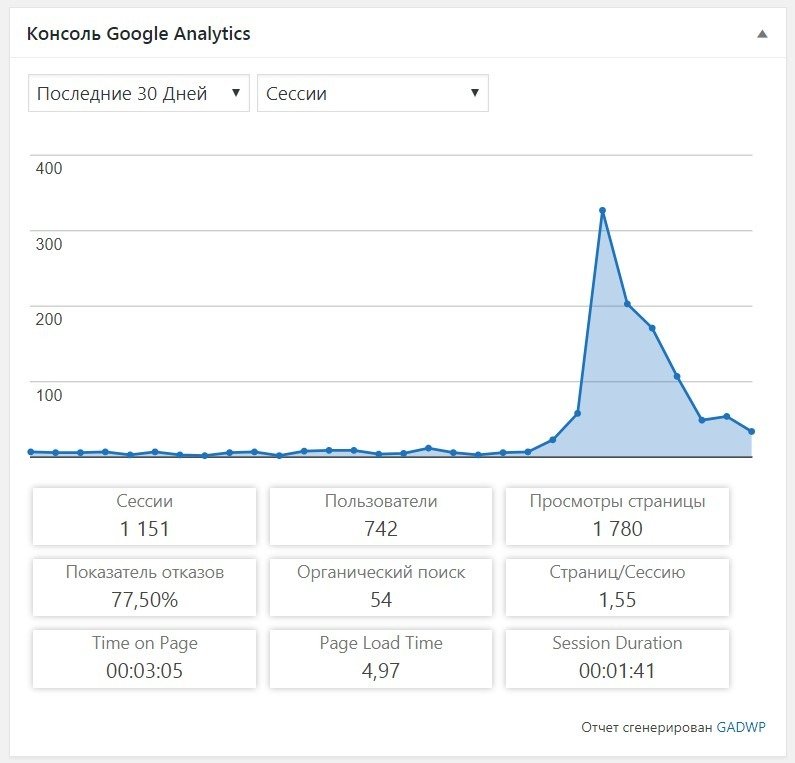 Подробнее
Информация
- Провайдер
- Google LLC
- Размер
- 161,6 МБ
- Категория
- Производительность
- Возраст
- 4+
- Copyright
- © Google Inc.
- Цена
- Бесплатно
- Сайт разработчика
- Поддержка приложения
- Политика конфиденциальности
Другие приложения этого разработчика
Вам может понравиться
Как работать с приложениями в Google Play Developers Console
Если оценка эффективности контента на странице приложения в сторе для вас — темный лес, обратите внимание на Google Play Developers Console. Я расскажу, как работать с этим инструментом.
Что такое Google Play Developers Console
Google Play Developers Console — кабинет разработчика, где непосредственно хранится ваше мобильное приложение (для владельцев Android доступна мобильная версия).
После того, как apk-файл вашего приложения готов, его необходимо добавить в магазин приложений Google Play.
Для этого:
- Регистрируете аккаунт, предварительно залогинившись в аккаунт Google под нужной почтой.
- Оплачиваете символическую сумму $25 за регистрацию.
- Добавляете приложение, категорию, описание, скриншоты и иконку, которые появятся на вашей странице в магазине.
- Отправляете приложение на модерацию.
- После одобрения отправляете приложение в свет.
В одной консоли может храниться несколько приложений. При входе в аккаунт вам необходимо выбрать то, с которым вы работаете.
Если у вас есть логин и пароль владельца кабинета, тогда проходите туда. Если нет, попросите предоставить пользовательский уровень доступа на ваш email с нужными вам полномочиями. Здесь — пошаговая инструкция о том, как это сделать.
После входа и выбора нужного приложения вы увидите следующие разделы:
Расскажу о самых важных разделах для маркетинга и поддержки продукта.
1. Раздел «Статистика»
Доступны данные:
1.1. Установок на конкретный момент — количество устройств, на которое за весь период было установлено ваше приложение. Если взять дату за последний день, который вам доступен, то получите общее количество телефонов/планшетов, у которых установлено ваше приложение на данный момент. Параметр «Установок на данный момент (пользователей)» показывает аналогичную информацию, но по пользователям.
1.2. Установок за день (устройств) и установок за день (пользователей) — параметр показывает динамику ежедневных установок на устройства и уникальному пользователю. Стоит помнить, что один пользователь может иметь несколько девайсов с одной учетной записью и установить приложение сразу на два. Если сравнить между собой эти два параметра, то они будут отличаться.
1.3. Удалений за день — показатель количества пользователей, которые удалили ваше приложение за вчерашний день. Метрика очень полезная и по сути уникальная, так как в AppStore такого отчета нет, а трекинговые системы такие данные не предоставляют.
Следите за Uninstall rate — коэффициентом удалений приложения пользователями, так как это влияет на ваши позиции в магазине.
Как считать этот коэффициент?
Uninstall rate = количество удалений / количество установок
1.4. Ежедневный рейтинг и общий рейтинг — средняя оценка приложения пользователями за день и за весь период.
Ежедневный рейтинг в консоли — не то же, что позиция в сторе (Rank History), которую показывает AppAnnie. Хотя рейтинги прямо влияют на позицию в магазине приложений.
1.5. Отчет «Активные пользователи» показывает количество пользователей, которые открыли приложение хотя бы раз в сутки, там же можно посмотреть и на динамику. Эти данные доступны только тем, кто поставил в приложение SDK Google Analytics. Об этом и других отчетах, доступных в Google Analytics, мы писали ранее.
1.6. Новые пользователи — это те, которые запустили приложение впервые. Отчет доступен также после связки консоли разработчика с Google Analytics. Читайте подробно о том, как различные трекеры считают установки.
Количество новых пользователей не равно количеству установок за одинаковый период.
2. Раздел «Источника трафика»
В отчете доступны два критерия: данные по источникам трафика и данные по странам. Сгенерировать отчет можно за день, неделю или месяц, выбрать период произвольно, к сожалению, нельзя.
Отчет представлен в виде воронки.
- Уникальные посетители страницы приложения в магазине.
- Количество пользователей, которые после просмотра установили приложение.
- Количество покупателей.
- Повторные покупатели.
Данные генерируются в виде когорты, то есть в отчет за выбранный диапазон времени попадут только те пользователи, которые за этот промежуток времени посетили страницу и установили приложение. О том, что такое когортный анализ и почему он важен для маркетинговых исследований, мы писали на примере Google Analytics.
Под графиком доступны данные в виде списка, где и расшифровываются источники трафика.
Показатель Play Маркет — это результаты вашего ASO, то есть результаты оптимизации страницы и ее индексации в магазине приложений.
По сути, это уникальные пользователи, которые перешли на страницу вашего приложения в результате поиска или просмотра приложений в Play Маркете.
3. Раздел «Оценки и отзывы»
Подраздел «Оценки» — это отчет, который позволяет посмотреть динамику оценок по дням, неделям, месяцам и оценить, как пользователи восприняли внедрение новой фичи.
«Отзывы» — поле для деятельности вашего репутационного менеджера, SMM-специалиста или любого другого человека, который отвечает за коммуникации с пользователями, которые пишут вам просьбы/жалобы в отзывах в сторе.
4. Раздел «Советы по оптимизации»
В этом разделе система Google Play Developers Console добровольно-принудительно просит вас о чем-то и показывает, что вы уже сделали. Например, добавить скриншоты для планшетов, если ваше приложение поддерживает подобные устройства.
5. Раздел «Данные для Google Play»
Этот раздел дополняет предыдущий отчет, так как он показывает то, что отображается на странице магазина — язык, краткое описание, полное описание, иконка, графические материалы.
На страницу Google Play очень желательно добавить промо-ролик, так как это влияет на привлекательность вашей страницы для стора и пользователя.
Выводы
Google Play Developers Console — инструмент, который можно и нужно использовать при маркетинге мобильного приложения. Разобравшись в Google Play Developers Console, вы поймете:
- как стор воспринимает ваше приложение;
- как стор показывает эффективность вашего контента на странице приложения.
По сути, это важное связующее звено между разработчиком продукта и его пользователями.
Первая иллюстрация — фото Фредди Фабриса из проекта «The Renaissance Series».
Netpeak запустил новую услугу «ASO с оплатой за результат» — заказывай через форму:
Хочу быстро найти клиентов онлайн
A guide to the Google Play Console | by Dom Elliott | Google Play Apps & Games
Whether you’re in a business or technical role, in a team of 1 or 100, the Play Console can help you with more than publishing
Read this in العَرَبِيَّة, Bahasa Indonesia, Deutsch, español (Latinoamérica), le français, português do Brasil, tiếng Việt, русский язы́к, ไทย, Türkçe, 한국어, 中文 (简体), 中文 (繁體), or 日本語.
You may have used the Google Play Console to upload an Android app or game, create a store listing, and hit publish to reach an audience on Google Play. But you may not realize that the Play Console has a lot more to offer, especially to those focused on improving the quality and business performance of their app.
Join me for a tour of the Play Console; I’ll introduce each feature and point you to some useful resources to make the most of them. Once you become familiar with the features, you can take advantage of user management controls to grant your teammates access to the right features or data that they need. Note: when I say ‘app’ in this post, I generally mean ‘app or game’.
Jump to a section:
- Find your way around
- Dashboard and statistics
- Android vitals
- Development tools
- Release management
- Store presence
- User acquisition
- Financial reports
- User feedback
- Global Play Console sections
- Get the Play Console app
- Stay up to date
- Questions?
If you’ve been invited to help manage an app or you’ve already uploaded an app, when you access the Play Console you’ll see something like this:
The signed-in view of the Play Console when you have an app or gameIn this post I’ll assume you have an app. If you’re getting started and publishing your first app, take a look at the launch checklist. I’ll come back to the global menu options (games services, alerts, and settings) later.
Pick an app from the list and you are taken to its dashboard. On the left-hand side there is a navigation menu (☰) with quick access to all the Play Console’s tools, let’s look at each in turn.
The first two items are dashboard and statistics. These related reports give you an overview of how your app is performing.
The dashboard answers key questions you have about your app with summaries of installs and uninstalls, top installing countries, active installs, ratings volume and value, crashes, Android vitals, and pre-launch reports. For each summary, click explore or view for more detailed information. You can switch the view between 7 days, 30 days, 1 year, and the app’s lifetime.
An app’s dashboardHopefully, the summary shows your app is succeeding with great install rates and few crashes. A quick glance at the dashboard is a simple way to see if anything isn’t going as expected, look out for: increasing uninstalls, increasing crashes, a sliding rating, and other poorly performing metrics. If all isn’t as you hoped, then you or your engineers can access more details to find the cause of different issues.
Statistics lets you build a view of the app data that matters to you. In addition to seeing data over any date range, you can plot two metrics simultaneously and compare them to a previous period. You can get a full breakdown of statistics by a chosen dimension (such as device, country, language, or app version) in a table below the graph. Some stats offer plots at hourly intervals, for more detailed insights. Events (such as app releases or sales) appear on the graph and in the events timeline below it, so you can see how they impacted your stats.
StatisticsAs an example, you might be running a new app promotion in Brazil. You can configure the report to show installs by country, filter the country list down to Brazil (from the dimensions table), and then compare the data with that from an earlier campaign to get a clear picture of how your promotion is going.
More resources for the dashboard and statistics
— Monitor your app’s stats, and review alerts for unexpected changes
— Analyze your audience & benchmark metrics to grow on Play (I/O ’18 session)
Big Fish Games used Android vitals to reduce crashes by 21% in their hit time management game, Cooking Craze.
Android vitals is all about your app’s quality, as measured by its performance and stability. An internal Google study conducted last year looked at one-star reviews on the Play Store and found 50% mentioned app stability and bugs. By addressing these issues you’ll positively impact user satisfaction, resulting in more people leaving positive reviews and keeping your app installed. When there is enough aggregated data, Android vitals can provide information about five aspects of your app’s performance: battery life, rendering (also known as jank), stability, startup time, and permission denials.
The first two measures — stuck wake locks and excessive wakeups — indicate if the app is adversely affecting battery life. The reports show where the app has asked a device to remain on for long periods (an hour or more), or is frequently asking the device to wake up (more than 10 wakeups per hour since a device was fully charged).
Information on app stability takes the form of the ANR (App Not Responding) and crash rate reports. The summary, as all the summaries in this section do, provides breakdowns by app version, device, and Android version. From the summary, you can drill down into details designed to help developers identify the cause of these issues. Recent improvements to the dashboard provide significantly more detail on ANRs and crashes, making them easier to diagnose and fix. Engineers can get more details from the ANRs & crashes section and load de-obfuscation files, which help improve the readability of crash reports.
The next two measures — slow rendering and frozen frames — relate to what developers call jank, or an inconsistent frame rate within an app’s UI. When jank occurs, an app’s UI judders and stalls, leading to a poor user experience. These stats tell you about the number of users who have:
- Had more than 15% of frames take over 16 milliseconds to render, or
- Experienced at least one frame out of 1,000 with a render time of greater than 700 milliseconds.
Information on slow app startup time gives you details of the percentage of sessions where cold starts took more than 5 seconds, warm starts took more than 2 seconds, and hot starts took more than a second.
The last vital is permission denials, where you see the percentage of daily permission sessions during which users denied permissions or denied permissions by selecting ‘never ask again’. A count of the approximate number of sessions recorded is also provided.
Behavior thresholds
For each metric, you’ll see a bad behavior threshold. If one of your Android vitals exceeds the bad behavior threshold, you see a red error icon. This icon means your app’s score is higher than other apps for that metric (and, in this case, being higher is worse!). You’ll also see anomalies in any vitals, when there’s a sudden change you should be aware of. You should address poor performance as soon as possible, because your audience is having bad user experience, and your app will be performing worse on the Play Store. This is because Google Play’s search and ranking algorithms, as well as all promotional opportunities that include the Google Play Awards, take into account an app’s vitals. Exceeding bad behavior thresholds contributes to downranking.
More resources for Android vitals
— Use Android vitals to improve your app’s performance and stability
— Learn how to debug and fix issues in the Android vitals documentation
— How to fix app quality issues with Android vitals (Part 1) (Medium post)
— Android vitals: debug app performance and reap rewards (I/O ’18 session)
— Quality over quantity: why quality matters (Playtime ‘17 session)
I’ll pass over this section; it’s a few tools for technical users of the console.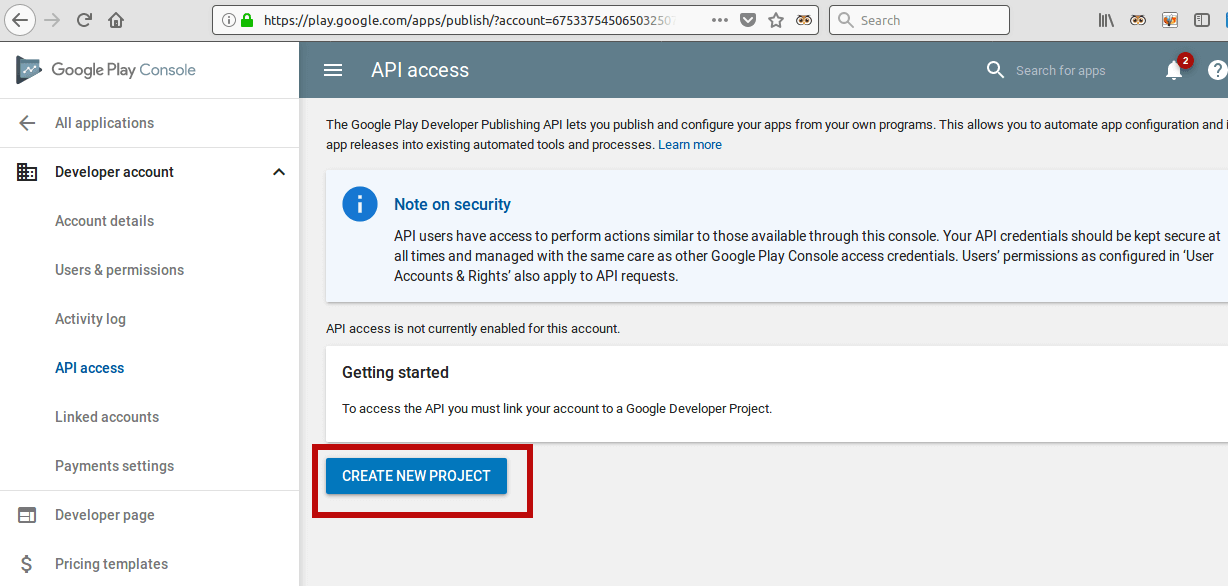 The services and APIs section lists the keys and IDs for various services and APIs, such as Firebase Cloud Messaging and Google Play games services. While FCM statistics shows you data associated with messages sent through Firebase Cloud Messaging. For more info visit the help center.
Zalando focused on quality and used release management tools to reduce crashes by 90% and increase user lifetime value by 15% on a quarterly basis.
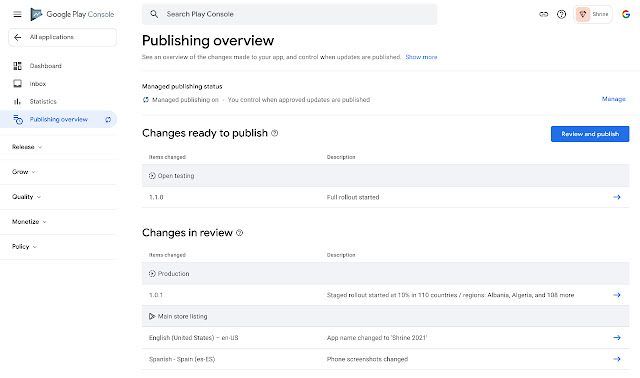
In the release management section, you control how your new or updated app gets to people’s devices. This includes testing your app before release, setting the right device targeting, and managing and monitoring updates in the testing and production tracks in real-time.
As an app release is taking place, the release dashboard gives you a holistic view of important statistics. You can also compare your current release with a past release. You might want to compare against a less satisfactory release, to make sure that similar trends aren’t repeating. Or, you can compare against your best release to see if you’ve improved further.
You should use staged rollouts for your releases. You choose a percentage of your audience to receive the app update, then monitor the release dashboard. If things aren’t going well — for example, crashes are spiking, ratings are falling, or uninstalls are increasing — before too many users are affected, you can click manage release and suspend the rollout. Hopefully, an engineer then resolve the issue before resuming the rollout (if the issue didn’t need an app update) or starting a new release (if an update was needed). When everything is going well, you can continue to increase the percentage of your audience who receive the update, until you reach 100%.
Google Play allows you to go through beta to your soft launch right through to global launch, constantly getting feedback from users. And this allows us to look at real data and to make the best possible game for our players.
— David Barretto, Co-Founder and CEO of Hutch Games
App releases is where apps (your Android App Bundles or APKs) are uploaded and prepared for release. Apps can be released to different tracks: internal, closed, open, and production. Use the internal track to release your app to up to 100 testers in seconds for internal testing and quality assurance checks. Use the closed testing track to test pre-release versions of your app with a larger set of testers. If needed, you can also create multiple closed tracks to test different versions of your app. When you’re ready, you can move to the open testing track to expand your test to a wider audience. Ratings and reviews you receive during your open test won’t affect your app’s public store listing. Saving your release as a draft is a good way to ensure all your app’s details are accurate and avoid mistakes before you’re ready to roll it out.
When you upload an Android App Bundle, Google Play automatically generates split APKs and multi-APKs for all device configurations your app supports. In the Play Console, you can use the App Bundle Explorer to see all APK artifacts that Google Play generates; inspect data such as supported devices and APK size savings; and download generated APKs to deploy and test locally.
[Instant Apps] makes it easy for a user to have a great app experience without the extra step of installing the app from the Play Store. We are already seeing great success with our instant app.
— Laurie Kahn, Principal Product Manager at Realtor.com
The Android Instant Apps section is like app releases, except it’s for instant apps. If you’re not familiar with instant apps, they allow users to instantly access a part of your app’s functionality from a link, rather than having to spend time downloading your full app from the Play Store. Check out the Android Instant Apps documentation for more details.
The artifact library is a technical section. It’s a collection of all the files, such as APKs, you’ve uploaded for your releases. If there’s some reason you need to, you can look back and download certain, old APKs from here.
On first use, [the device catalog] saved me from making a bad, uninformed decision. I was planning to exclude a device, but then I discovered it had good installs, a 4.6 rating, and significant 30d revenue. Having such data in the catalog is awesome!
— Oliver Miao, Founder and CEO of Pixelberry Studios
The device catalog includes thousands of Android and Chrome OS devices certified by Google, offering the ability to search and view device specs. With the granular filtering controls available, you can exclude a narrow range of problem devices in order to offer the best experience on all devices your app supports. You can individually exclude devices and/or set rules by performance indicators such as RAM and System on Chip. The catalog also shows installs, ratings, and revenue contributed by each device type. A low average rating on a specific device, for example, could be the result of a device issue not caught in general testing. You could exclude a device like that and temporarily halt new installs until you’ve rolled out a fix.
Play App Signing is a service we introduced to help keep your app signing key secure. Every app on Google Play is signed by its developer, providing a traceable verification that the developer who claims to have written the app did write the app. If the key used to sign an app is lost, it’s a major issue. You wouldn’t be able to update your app. Instead, you’d need to upload a new app, losing the app’s history of installs, ratings, and reviews and potentially causing user confusion when you try to get them to switch over. With app signing, after opting in you upload your app signing keys to store them securely in Google’s cloud. It’s the same technology we use at Google to store our app keys, backed by our industry-leading security infrastructure.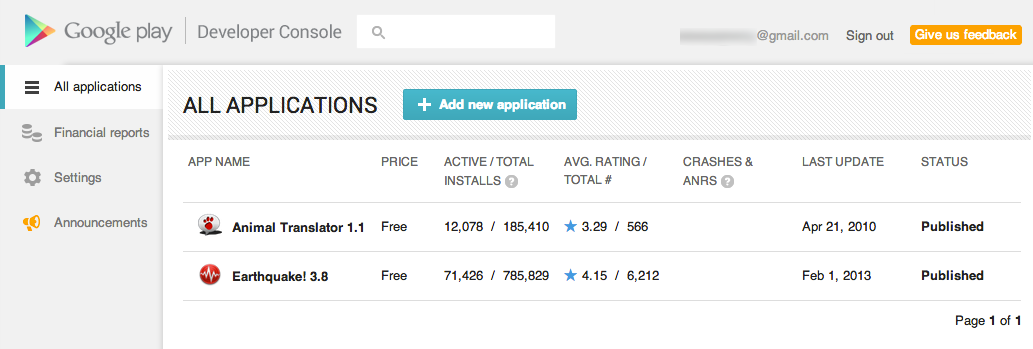 The uploaded keys are then used to sign your apps when you submit updates. When you upload a brand new app, it’s easy to enroll in app signing during the first upload. We’ll generate an app signing key for you.
Language learning app developer Erudite attributed use of the pre-launch report to increasing retention rate by 60%.
The final option in this section is pre-launch report. When you upload your app to the closed or open testing tracks, we’ll run automated tests on popular devices with a range of specifications in the Firebase Test Lab for Android and share the results. These tests look for certain errors and issues relating to crashes, performance, and security vulnerabilities. You can extend the standard tests to harder to reach parts of your app by creating demo loops for games written with OpenGL, recording scripts in Android Studio for the test crawler to follow, identifying deep links, and providing credentials to go behind logins. In addition to reporting crashes, performance, and security issues, screenshots of your app running on different devices and in different languages are available to view. Tests are also run for apps using Google Play licensing services.
Limited or incomplete testing can result in the launch of an app whose quality leads to low ratings and negative reviews, a situation that can be difficult to recover from. The pre-launch report is a good starting point for a thorough test strategy and can help you identify and fix common issues in your app. However, you’ll still need to run a suite of tests that comprehensively check your app. Building tests in the Firebase Test Lab for Android, which offers additional functionality over the pre-launch report, and taking advantage of the lab’s ability to run those tests automatically on multiple devices, can be more effective and efficient than manual testing.
More resources for release management
— Meet user expectations by testing against the quality guidelines
— Use pre-launch and crash reports to improve your app
— Use test tracks to get invaluable early feedback
— Autonomous & customized pre-launch testing in Play Console (I/O ’18 session)
— Build the new, modular Android App Bundle (I/O ’18 session)
— Release management: successful launches and updates on Play (I/O ’18 session)
— The future of apps: modular, instant, and dynamic (I/O ’18 session)
— Derisk your game launch (Playtime ‘17 session)
— Publish smaller apps with the Android App Bundle (DevByte video)
This section is where you manage your app’s presentation on Google Play, run experiments on your app’s listing content, set pricing and markets, get a content rating, manage in-app products, and get translations.
The store listing section is what you’d expect — it’s the place where you maintain your app’s metadata such as its title, descriptions, icon, feature graphic, feature video, screenshots, store categorization, contact details, and privacy policy.
Store listingA great store listing has an eye-catching icon; a feature graphic, video, and screenshots (from all device categories and in all orientations supported) that show what’s special about the app; and an attention-grabbing description. For games, upload a video and at least three landscape screenshots to ensure your game is eligible for video/screenshot clusters in the games section of the Play Store. Knowing what content will work best and drive the most installs can be a challenge. However, the next section of the console is designed to take the guesswork out of answering that question.
After running store listing experiments with the app icon and screenshots, Japanese real estate app LIFULL HOME’S saw installation rates increase by 188%.
Store listing experiments enable you to test many aspects of your store listing, such as its descriptions, app icon, feature graphic, screenshots, and promo video. You can run global experiments on images and videos and localized experiments on text. When you run an experiment, you specify up to three variants of the item you want to test and a percentage of the store visitors who will see the test variants. The experiment runs until it has been exercised by a statistically significant number of store visitors and then tells you how the variants compared. If you have a clear winner, you can choose to apply that variant to your store listing and display it to all visitors.
Store listing experimentsEffective experiments start with a clear objective. Test your app icon first because it’s the most visible part of your listing, followed by the other listing content. Test one content type per experiment to get more reliable results. Experiments should be run over at least seven days and, particularly where store traffic is low, on 50% of store visitors — but, if the test could be a little risky, keep the percentage low. Plan for iteration by taking the winning content from one experiment and testing against further variations on the theme. For example, if your first test finds a better character to include in a game’s icon, your next experiment could test the effect of variations in icon background color.
Pricing & distribution is where you set the price for your app and can restrict the countries to which its distributed. This is also where you indicate whether your app is optimized for specific device categories such as Android TV and where you opt your app into programs such as Designed for Families. Each device category and program has requirements and best practices, I’ve added links to more information about each below.
Pricing & distributionAs you set your prices, you’ll notice a localization feature where the console automatically rounds prices to match the convention most appropriate for a particular country. For example, ending prices in .00 for Japan. At this point, you may also want to create a pricing template. With a pricing template, you create a set of prices by country that you then apply to multiple paid apps and in-app products. Any changes to the template are automatically applied to all the apps or products whose prices are set with the template. Find your pricing templates in the global settings menu of the console.
Having set the details for your app, the most likely reasons for returning to this section are to run a paid app sale, opt-in to a new program, or update the list of countries in which your app is distributed.
Learn more about distribution device categories and programs
— Distribute to Android TV
— Distribute to Android Auto
— Optimize for Chrome OS devices
— Distribute to Daydream
— Distribute to Wear OS by Google
— Distribute to enterprises and organizations using managed Google Play
— Distribute family or kid-focused apps and games
Next up is your app’s content rating. A rating is obtained by responding to a content rating questionnaire and, once complete, your app receives the appropriate rating badges from recognized authorities around the world. Apps without a content rating will be removed from the Play Store.
The in-app products section is where you maintain a catalog of the products and subscriptions sold from your app. Adding items here doesn’t add functionality to your app or game, the delivery or unlocking of each product or subscription needs to be coded into the app. The information here governs what the store does with these items, such as how much it charges users and when it renews subscriptions. So, for in-app products, you add their descriptions and prices while for subscriptions, in addition to descriptions and price details, you add a billing cycle, trial period, and non-payment grace period. Item prices can be set up individually or based on a pricing template. Where prices are set individually for countries, you may accept the price based on the prevailing exchange rate or set each price manually.
Noom grew international revenue by 80% by localizing their app on Google Play.
The last option in this section is the translation service. The Play Console gives you access to reliable, vetted translators to translate your app into new languages. You’re much more likely to increase your store listing conversion rate and increase your installs in a particular country when your app is available in the local language. There are tools in the Play Console that can help identify suitable languages to translate into. For example, using the acquisition report you can identify the countries with many visits to your store listing but low installs. If your technical team is working on translating your app’s user interface via this service, you can get your text translated too. Do this by including store listing metadata, in-app product names, and universal app campaign text in the strings.xml file before it’s submitted for translation.
More resources for store presence
— Make a compelling Google Play Store listing to drive more installs
— Showcase your app with an attention grabbing feature graphic
— Convert more visits to installs with store listing experiments
— Go global and successfully grow valuable audiences in new countries
— Analyze your audience & benchmark metrics to grow on Play (I/O ’18 session)
Peak Games average cost per acquisition has been about 30–40% lower on Android than on other mobile platforms.
Every developer wants to reach an audience, and this section of the Play Console is about understanding and optimizing your user acquisition and retention.
In acquisition reports, you access up to three reports (the tabs at the top) depending on whether you sell in-app products or subscriptions:
- Retained Installers — shows the number of visitors to your app’s store page, then how many of them installed your app and kept it installed over 30 days.

- Buyers — shows the number of visitors to your app’s store page, then how many of them installed your app and went on to buy one or more in-app products or subscriptions.
- Subscribers — shows the number of visitors to your app’s store page, then how many of them installed your app and went on to activate an in-app subscription.
Each report includes a graph that shows the number of unique users who visited your app’s store listing during the reporting period, followed by the number of installers, retained installers, and (on the buyers or subscribers report) buyers or subscribers. Some reports will be blank if we’ve determined there’s not enough data to show. Use the “measured by” dropdown to switch between data broken down by:
- Acquisition channel — shows a table of data broken down by where visitors come from, such as the Play Store, Google Search, AdWords, etc.
- Country — shows the total number of visitors for each country.
- Country (Play Store organic) — filters the country totals to show you visitors coming to your store listing organically by searching and browsing on Google Play.
On all the reports, you can toggle the option to view installers who didn’t visit the store listing page, such as those installing directly from Google Search results or on play.google.com/store.
Acquisition reportsWhen reviewing the report by acquisition channel or country (Play Store organic), when there’s enough data you’ll be able to view average revenue per user, conversion rate, retention benchmarks. Based on your app’s category and monetization method, these benchmarks give you a comparison of your app’s performance with all similar apps in the Play Store. Benchmarks are a handy way of checking whether you’re doing a good job driving installs.
Conversion rate benchmarksOne way of increasing your installs is to run an advertising campaign, and you can get started quickly from AdWords campaigns. You can create and track a universal app campaign from this section. This type of campaign uses Google’s machine learning algorithms to find the best acquisition channel for your app and target cost per install (CPI). Provide text, images, and videos for the campaign and AdWords does the rest, placing ads on Google Play, Google Search, YouTube, in other apps via the AdMob network, and on mobile sites on the Google Display Network.
Once your universal app campaign is up and running, you’ll get additional data in the acquisitions reports. For detailed tracking, check out the reporting in your AdWords account.
Another option for driving installs and engagement is to run promotions. Here you create promotion codes and manage promotion campaigns, so that you can give away copies of your app or in-app products for free. You can use the promotion codes in your marketing on social media, for example, or in an email campaign.
The final feature in this section is optimization tips. These tips are generated automatically when we detect changes that can improve your app and its performance. Optimization tips may suggest languages to translate your app into based on where it’s popular, recognize the use of certain outdated Google APIs, identify when you might benefit from using Google Play games services, or detect when your app is not optimized for tablets, among other tips. Each tip includes instructions to help you with implementation.
More resources for user acquisition and retention
— Understand where your valuable users come from and optimize your marketing
— Increase downloads with universal app campaigns
— Go global and successfully grow valuable audiences in new countries
— Taking the guesswork out of paid user acquisition (Medium post)
— How to optimize your Android app for emerging markets (Medium post)
— Analyze your audience & benchmark metrics to grow on Play (I/O ’18 session)
— Android (Go edition): optimize your app for global markets (I/O ’18 session)
The analytics and testing capabilities offered by Play are unparalleled and equip developers like Hooked with key insights that help us grow, and are crucial in helping us understand and optimize our revenue.
—Prerna Gupta, Founder & CEO, HOOKED
If you sell your app, in-app products, or subscriptions, you’ll want to track and understand how your revenue is going. The financial reports section provides you with access to several dashboards and reports.
The section’s first report provides an overview of revenue and buyers. The report shows how your revenue and buyer performance has changed compared to the last report period.
Financial reportsSeparate reports offer a detailed breakdown of revenue, buyers, and conversions offering insight into users’ spending patterns. Each report lets you view data for specific periods such as the last day, 7 days, 30 days, or over the app’s lifetime. You can also drill down into device and country data on the revenue and buyers reports.
The conversions report helps you understand users’ spending patterns. The conversion rate table shows what percentage of your audience is purchasing items in your app and helps you see the impact of recent changes on conversion. The spending per buyer table gives you insight into how users’ spending habits change and the lifetime value of your paying users.
More resources for monetization
— Sell in-app products with Google Play Billing
— Design your app to drive conversions
— Improve conversions using Google Analytics for Firebase
— From app explorer to first-time buyer (Medium post)
— Predicting your app’s monetization future (Medium post)
— Predicting your game’s monetization future (Medium post)
— Five tips to improve your games-as-a-service monetization (Medium post)
— Driving conversions on Android apps (Playtime ‘17 session)
— Playing with games lifetime value (Playtime ‘17 session)
— Making money on Google Play (DevByte)
— Play Billing Library 1.0 (DevByte video)
Subscription data that’s readily available for analysis is valuable. Being able to see how subscriptions perform over time is something many developers would find useful.
—Kyle Grymonprez, Head of Cross-Platform and Android development at Glu

Finally, if you offer subscriptions, the dashboard gives you a comprehensive view of how subscriptions are performing to help you make better decisions about how to grow subscriptions, decrease cancellations, and increase revenue. The dashboard includes an overview, a detailed subscriptions acquisition report, a lifetime retention report, and a cancellation reports. You can also see how successful features such as free trials, account holds, and grace periods are in acquiring and retaining users. With this information, identify opportunities to optimize your marketing and in-app messaging to drive new subscribers and reduce churn.
Subscriptions dashboardMore resources for subscriptions
— Sell subscriptions with Google Play Billing
— Building a subscriptions business for all seasons (Medium post)
— How to hold on to your app’s subscribers (Medium post)
— Outsmarting subscription challenges (Medium post)
— Use behavioural economics to convey the value subscriptions (Medium post)
— How to win back subscribers who cancel (Medium post)
— Grow and optimize your subscriptions with new Play features (I/O ’18 session)
The ratings and review section is a powerful tool to learn from your community.
— Andres Ballone, Chief Product Officer at Papumba
 We are answering them in their native language with the help of Google Translate. As a result, we’ve seen a great improvement in user ratings. In fact, all of them are 4.4 stars or even higher on average.
Ratings and user feedback via reviews are important. Play Store visitors consider your app’s ratings and reviews when they’re deciding whether to install it. Reviews also provide a way to engage with your audience and gather useful feedback about your app.
Ratings is where you get a summary of all ratings with breakdowns over time by country, language, app version, Android version, device, and carrier. You can drill down into this data to see how your app’s rating compares to the benchmark rating for its app category.
When it comes to analyzing this data, there are two key things to look for. The first is ratings over time, particularly whether ratings are going up or down. Decreasing ratings suggest you need to review recent updates. Perhaps updates have made the app harder to use or introduced issues that cause it to crash more often. The second use is to look for areas where ratings are out of line. Perhaps there is a low rating for a language — suggesting your translation isn’t up to scratch. Or ratings could be low on a specific device — suggesting your app isn’t optimized for that device. Where you have a generally good rating, finding and addressing poor rating ‘pockets’ can help you lift the ratings, particularly when app improvement opportunities are harder to find.
We use reviews analysis to gather feedback from users on Google Play and use them to polish Erudite’s features. It also allows us to reply to users directly and individually, so we can improve the communication with our users and know their true requirements.
— Benji Chan, Product Manager at Erudite
Users can provide ratings for your app without providing a review, but when they do include a review its content can provide insight into what is driving their rating. This is where the reviews analysis section comes into play. It provides three insights: updated ratings, benchmarks, and topic analysis.
Updated ratings helps you understand how users who change their reviews also change the rating they provide. The data is broken down between reviews where you responded and those where you didn’t. You should find that the report shows that responding to poor reviews (for example, if you replied to let a user know an issue has been fixed) often results in users returning and revising their rating upward.
Benchmarks provides an analysis of ratings based on common review topics for an app category. So, for example, you can see how users are mentioning your app’s sign up experience and how reviews on that subject are contributing to your rating. Also, you can see how your rating and number of reviews compare to similar apps in the same category. If you want to explore further, clicking a topic takes you through to the reviews that made up this analysis.
Topics provides information about key words used in your app’s reviews and their effect on ratings. From each word, you can drill down to see the details of the reviews that it appears in, to get a more detailed understanding of what is going on. This feature provides analysis for reviews in English, Hindi, Italian, Japanese, Korean, and Spanish.
It makes it easy for us to search through the reviews, contact users when we need to get more information from them and, just in general, it has saved me a tremendous amount of time, anywhere between 5 and 10 hours a week.
— Olivia Schafer, Community Support Specialist at Aviary
In the reviews section itself, you get to see individual reviews. The default view shows the most recent reviews from all sources and in all languages. Use the filter option to refine the list. Notice the all reply states option. Filter the reviews to look at those you haven’t replied to, as well as the reviews where you replied and users have subsequently updated their review or rating. Replying to reviews is easy, in a review simply click reply to this review.
Occasionally you’ll come across reviews that break the Comment Posting Policy. When you do, you can report these reviews by clicking the flag in the review’s tile.
ReviewsUsing beta feedback, with Early Access, Spanish game developer Omnidrone was able to improve retention by 41%, engagement by 50%, and monetization by 20%.
There’s a section specifically for beta feedback. When you run an open beta test of your app, any feedback provided by testers ends up here — it doesn’t get included in your production app’s ratings and reviews and isn’t visible publicly. The features are like those for public feedback: you can filter reviews, reply to reviews, and see the history of conversations with users.
More resources for user feedback
— Browse and reply to app reviews to positively engage with users
— Analyze user reviews to understand opinions about your app
So far, I’ve looked at the Play Console features that are available for each app. Before finishing, I want to give you a brief guide to the global Play Console features: games services, order management, download reports, alerts, and settings.
Senri implemented Play games services saved games in Leo’s Fortune as well as one Leaderboard per chapter. Google Play games services users were 22% more likely to come back after 1 day and 17% more likely after 2 days.
Google Play games services offers a range of tools that provide game features to help drive player engagement, such as:
- Leaderboards — a place for players to compare their scores with friends and compete with top players.
- Achievements — set goals in your game that players earn experience points (XP) for completing.
- Saved Games — store game data and synchronize it across devices so players can easily resume play.
- Multiplayer — bring players together with real-time and turn-by-turn multiplayer gaming.
A number of these features can be updated and managed without changing the game’s code.
Eric Froemling used player analytics to grow average revenue per user by 140% and increase average revenue per paying user by 67%, for the game Bombsquad.
Player analytics puts valuable information about your game’s performance in one place, with a set of free reports to help you manage your game’s business and understand in-game player behavior. It comes as standard when you integrate Google Play games services to your game.
Player analytics (enabled as part of Google Play games services)You can set a daily goal for player spending, then monitor performance in the target vs. actual chart and identify how your players’ spending compares to benchmarks from similar games in the business drivers report. You can track player retention by new user cohort using the retention report and see where players are spending their time, struggling, and churning with the player progression report. Then get help managing your in-game economy with the sources and sinks report and check, for example, that you’re not giving away a resource faster than players are using it.
You can also drill into details of player behavior. Use funnels to create a chart from any sequenced events, such as achievements, spend, and custom events or use the cohorts report to compare the cumulative event values, for any event, by new user cohorts. Get insights into what happens to your players during critical moments with the player time series explorer and create reports based on your custom Play Games’ events with the events viewer.
More resources for Google Play games services:
— Use Google Play games services to create more engaging game experiences
— Use player analytics to understand better how players behave in your game
— Manage your games business with revenue targets through player analytics
— Medium posts for game developers
— New and advanced Google Play tools for game developers (I/O ’18 session)
Order management provides access to details of all payments made by users. Members of your customer service team will use this section to find and refund payments (including partial refunds) for in-app products and subscriptions or cancel subscriptions.
Download reports to obtain data including details for crashes & application not responding errors (ANRs), reviews, and financial reports. Also, aggregated data for installs, ratings, crashes, Firebase Cloud Messaging (FCM), and subscriptions is available. You can use these downloads to analyze the data captured by the Play Console using your tools.
Alerts surfaces issues related to crashes, installs, ratings, uninstalls, and security. For games using Google Play games services, there are alerts for game features that may be blocked because they aren’t being used correctly, for reaching limits or exceeding quota for API calls, and others. You can opt-in to receive alerts via email in the notifications section of the settings menu.
Settings provides various options to control your developer account and the behavior of the Play Console.
One settings feature under developer account that I want to highlight is user accounts & rights. You have complete control over who can access features and data for your app in the console. You can provide each of your team member’s with view or edit access to the whole account or just to specific sections. For example, you might choose to grant your marketing lead edit access to your store listing, reviews, and AdWords campaigns, but not to other sections of the console. Another common use of access rights is to make your financial reports visible only to those that need to see them.
You should set up your developer page to showcase your apps or games and company’s brand on the store when people tap your developer name. You can add a header image, your logo, a brief description, your website URL, and pick a featured app (a full list of your apps is automatically visible).
In preferences, you can choose which Play Console notifications you receive via the web interface or email, sign up for news and elect to take part in feedback and surveys, tell us about your role, and change your preference to share your console use data with us.
The screenshots throughout this post show the Play Console in a web browser, however there’s a Play Console app available for your Android device too. Get quick access to your app’s statistics, ratings, reviews, and release information. Get notifications for important updates, like when your latest release is actually live on the store, and perform quick actions like replying to reviews.
Get it on Google Play.
There are several ways to stay up-to-date with the latest and greatest from Google Play:
- Tap the 🔔 in the top right hand corner of the Play Console to see notifications about new features and changes you should know about.
- Sign up to get news and tips by email including our monthly newsletters.
- Follow us here on Medium for longform posts from the team with best practices, business strategies, research, and industry thoughts.
- Connect with us on Twitter or Linkedin and start up a conversation.
- Get the Playbook app for developers for curated posts (including all our blog and Medium posts) and YouTube videos to help you grow a successful business on Google Play, and choose what you get notified about.

Questions or feedback about the Play Console? Get in touch!
Comment below or tweet at us using the hashtag #AskPlayDev and we’ll reply from @GooglePlayDev, where we regularly share news and tips on how to be successful on Google Play.
unity3d — Почему не получается создать новый выпуск в Google Console?
Вопрос задан
Изменён 1 месяц назад
Просмотрен 2k раз
Не понимаю в чём причина. 5 января загружал новое приложение, всё нормально. Сейчас решил обновить старое (2 месяца назад последний раз) и выдаёт вот это:
Вы загрузили APK-файл или набор Android App Bundle с объектом activity, псевдонимом объекта, сервисом или широковещательным приемником с фильтром intent, но без набора свойств android:exported.
Манифест файл:
По этому пути: Assets\Plugins\Android\AndroidManifest.xml Дописал строчку о которой говорилось в статье: android:exported=»true», но та же ошибка.
<!-- GENERATED BY UNITY. REMOVE THIS COMMENT TO PREVENT OVERWRITING WHEN EXPORTING AGAIN-->
<manifest
xmlns:android="http://schemas.android.com/apk/res/android"
package="com.unity3d.player"
xmlns:tools="http://schemas.android.com/tools">
<application>
<activity android:name="com.unity3d.player.UnityPlayerActivity"
android:exported="true"
android:theme="@style/UnityThemeSelector">
<intent-filter>
<action android:name="android. intent.action.MAIN" />
<category android:name="android.intent.category.LAUNCHER" />
</intent-filter>
<meta-data android:name="unityplayer.UnityActivity" android:value="true" />
</activity>
</application>
</manifest>```
Помогите, прошу. Пробовал по разному уже. И true, и false, но не хочет.

- unity3d
- google-play
- unity3d-android
- google-console
3
Ребят, я потратил много времени на устранение проблемы, но таки решил её. Нужно изменить API с API 32 до API 30 — Это устранит ошибку при загрузке .aab в GooglePlay.
Но при билдинге .aab файла в юнити у меня вышла другая ошибка…
WARNING: The option setting ‘android.enableR8=true’ is deprecated. It will be removed in version 5.0 of the Android Gradle plugin.
и ещё ошибка
Warning: Mapping new ns http://schemas.
 android.com/repository/android/common/02 to old ns
http://schemas.android.com/repository/android/common/01 FAILURE: Build
failed with an exception.
What went wrong: Could not determine the dependencies of task ‘:launcher:minifyReleaseWithR8’.
Installed Build Tools revision 32.0.0 is corrupted. Remove and install again using the SDK Manager.
android.com/repository/android/common/02 to old ns
http://schemas.android.com/repository/android/common/01 FAILURE: Build
failed with an exception.
What went wrong: Could not determine the dependencies of task ‘:launcher:minifyReleaseWithR8’.
Installed Build Tools revision 32.0.0 is corrupted. Remove and install again using the SDK Manager.так вот вместо того чтобы устранять первую ошибку и ставить галочку в Publishing Settings — Custom Base Gradle Template и вносить изменения в кастомные файлы baseProjectTemplate.gradle (Всё это делать было не нужно! т.к. Ошибки не уйдут.)
Нужно было обратить внимание на вторую ошибку которая «Installed Build Tools revision 32.0.0 is corrupted» сдесь вам поможет — https://stackoverflow.com/questions/68387270/android-studio-error-installed-build-tools-revision-31-0-0-is-corrupted user16475264
И у меня всё сбилдилось без галочек и кастомных файлов, но только на API30. Я счастлив!
Открой AndroidManifest.xml и проверь наличие в библиотеках android:exported = true если их нет обнови библиотеку.
1
Проблема была в том, что я поставил самый высокий Target API (32), он появился недавно. Кастомный манифест в этом случае никак не помогает, по всей видимости юнити ещё не доделала это. Минимальный апи может быть 30 и с ним при загрузке проблем нет.
В окне Build Settings включи галочку Export Project, затем кнопку Build, и выбери папку, куда будет помещен android проект. После сборки перейди в эту папку, далее unityLibrary\src\main и там будет лежать AndroidMainfest.xml. Проверь, все ли активности и ресиверы имеют android:exported, если нет, то пробуй обновить нужные бтблиотеки.
В моем случае нужно было обновить пакет Mobile Notifications в окне Package Manager
android:exported=»false»> может ты забыл добавить в конце >. Вопрос задан 7 месяцев назад, но может кто-то тоже забыл добавить >.
1
Обновление полезного контента, обновление отзывов о продуктах, проблемы с индексированием и многое другое
Главная > Новости Google > Google SEO > Отчет Google для веб-мастеров за сентябрь 2022 г. это боль, чтобы собрать вместе. Но это важно, и я хотел рассказать вам об изменениях в Google SEO, веб-мастерах и органическом поиске за последний месяц.
Главной новостью, очевидно, является полезное обновление контента от Google, которое, как я думал, будет масштабным, но после того, как оно начало развертываться, оказалось, что это вовсе не огромная встряска. У меня есть тонна историй ниже только на эту тему, так что ознакомьтесь с ними ниже. Мы также увидели завершение четвертого обновления обзоров продуктов, и Google сообщает, что скоро появится пятая версия.
У Google были серьезные проблемы с поиском Google, в том числе перебои в работе, проблемы с индексацией и выпадение страниц — это было дико.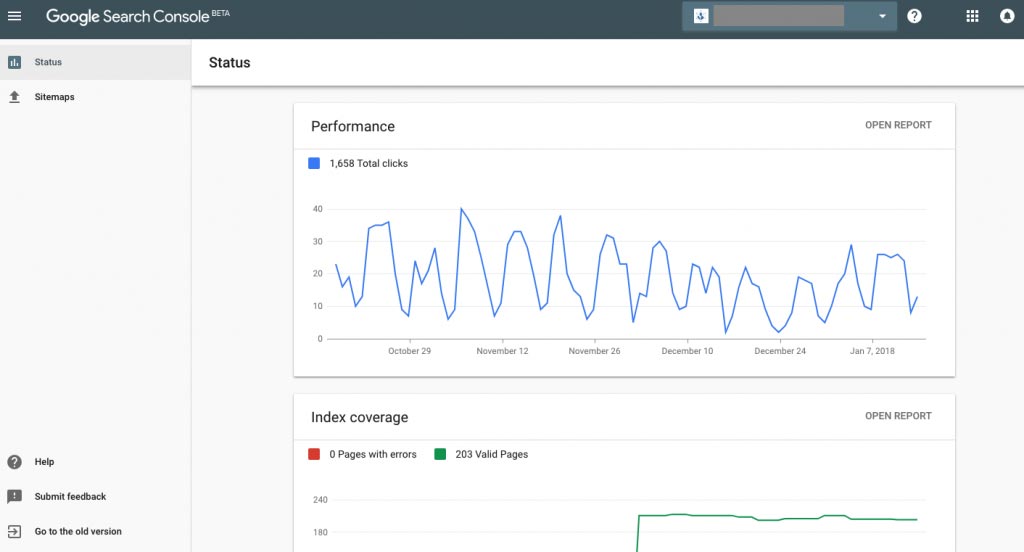 Google запустил новые избранные фрагменты, включая выноски, улучшения ложных предпосылок, дополнения MUM и многое другое. Ранее в августе также было неподтвержденное обновление. А знаете ли вы, что в течение длительного времени ни одно обновление поискового алгоритма не фокусировалось на ссылках, и что поиск изображений теперь использует Google Lens.
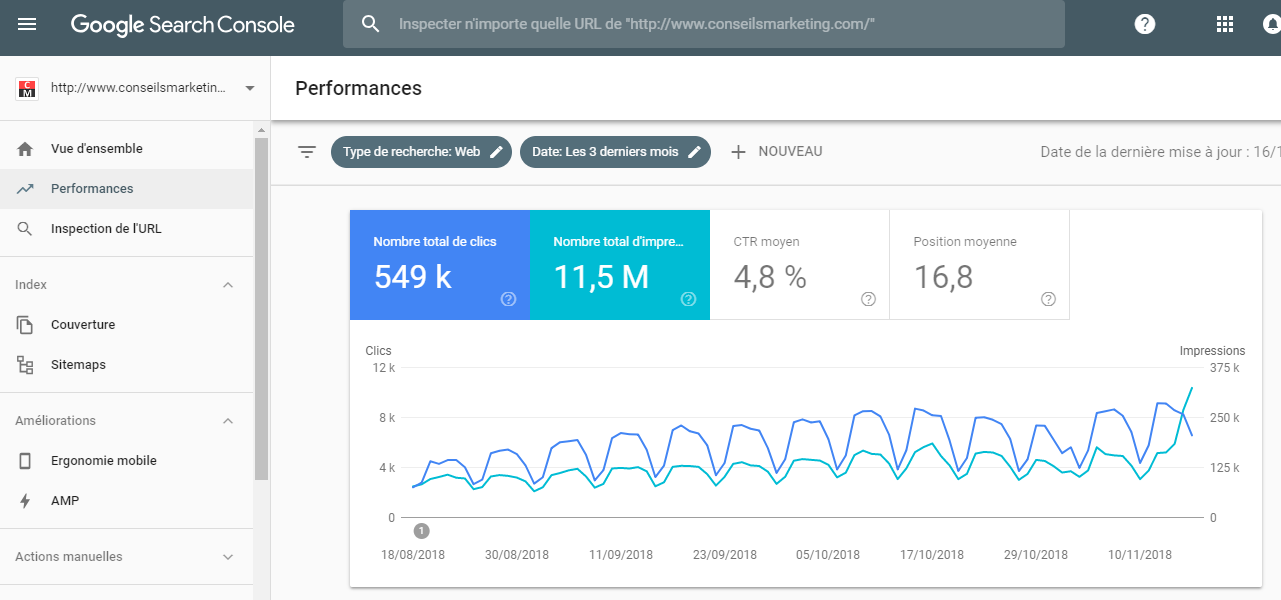
Google улучшил ошибки Search Console и, таким образом, устранил сбой проверки исправления. Новые отчеты об индексации видео Search Console полностью доступны и многое другое. Кроме того, в прошлом месяце у нас было много Google SEO, пользовательского интерфейса, местных и других тем.
Если вы пропустили отчет за прошлый месяц, ознакомьтесь с отчетом Google для веб-мастеров за август здесь.
Вот наиболее важные истории, которые я вытащил для всех вас: Обновление полезного контента Google:
- Новое обновление полезного контента Google, чтобы изменить SEO так же, как Panda
- Выходит обновление полезного контента Google
- Форма отзыва об обновлении полезного контента Google
- Обновление полезного контента Google пока кажется слабым и медленным. ..
- Google еще не закончил развертывание обновления полезного контента Опрос
- : только 20% заметили изменения рейтинга после обновления полезного контента Google
- Опрос: многие оптимизаторы говорят, что контент, который они производят, полезен и не вызывает беспокойства
- Дэнни Салливан: обновление полезного контента Google — большая, но не огромная встряска
- Google: скачки скорости сканирования не являются признаком полезного обновления контента
- Движение за обновление полезного контента Google? Да, но не широко распространен.
 ..
..Другие алгоритмы Google:
- Поиск Google сейчас сильно нарушен: сбои, проблемы с индексированием, пропавшие страницы и многое другое
- Выноски Google Featured Snippet, ложные предпосылки, MUM и многое другое
- Обновление алгоритма ранжирования поиска в Google в субботу, 6 августа — толчки PRU или что-то еще?
- Google запустит пятое обновление обзоров продуктов всего через несколько недель после последнего обновления
- Июль 2022 г. Обновление Google Product Reviews завершено 2 августа, и никто ничего не сказал
- Недовольны последним обновлением Google Product Reviews? Скажи Гуглу.
- Джон Мюллер из Google: нет последних поисковых алгоритмов, ориентированных на ссылки за пределами веб-спама
- Google Image Search теперь использует Google Lens
Google SEO:
- Google может чаще сканировать разделы сайта и определять качество по разделу
- Google: Noindex для одного URL-адреса в кластере Hreflang может повлиять на все URL-адреса в этом кластере
- Google предоставляет примеры того, как улучшить ваши метаописания
- Google: Soft 404 тратит впустую бюджет сканирования
- Google может удалить счетчик слов из Search Console. Ошибки содержания новостных статей
- Google: рост микроданных довольно застойный
- Google добавляет рекомендации по содержанию в документацию по структурированным данным для образования, вопросы и ответы
- Google Now поддерживает структурированные данные «за» и «против» для страниц отзывов
- Документы Google Learning Video Structured Data Docs выходят на новый уровень образовательного уровня
- Структурированные данные Google Local Business не поддерживают дополнительный тип; Вместо этого используйте массив
- Google: добавление структурированных данных видео не сделает ваше видео более заметным
- Google: не индексировать страницы с комментариями, оставить только хорошие комментарии
- Google: рекомендации для оценщиков качества не являются сборником советов по ранжированию
- Google: нет преимуществ SEO ни для динамического рендеринга, ни для рендеринга на стороне сервера
- Google: динамическая визуализация — это обходной путь, а не долгосрочное решение
- Политика Google Merchant Center в отношении отсутствия политики возврата/возврата средств или недостаточной контактной информации обновлена
- Google: что делать со старыми страницами событий
- Google: ограничение в 50 000 файлов Sitemap на основе URL-адресов местоположения, а не альтернативных URL-адресов
Google Search Console:
- Google Search Console Подтвердить Исправление Сейчас Назад
- Отчет об индексе видео Google Search Console теперь полностью актуален
- Отчет Google Core Web Vitals добавляет данные об уровне URL-адресов для примеров URL-адресов
- Google исправляет ошибку консоли поиска, помечающую страницы как проиндексированные, если они не проиндексированы
- Отчет об охвате Google Search Console: новые исходные и неотправленные страницы
- Отчет о производительности Google Search Console для обнаружения проблемы с отчетами от 26 июля
Пользовательский интерфейс Google:
- Google Search Tests показывает все параметры строки меню
- Google тестирует ярлык быстрого чтения и 5-минутного чтения в результатах поиска
- Google Search Беседы, обсуждения и форумы
- Google Search Tests Изучение брендов с изображениями продуктов и без них
- Наложение предварительного просмотра изображений для поиска Google теперь полностью отображается в результатах веб-поиска
- Функция Google расширена за счет источников в Интернете
- Двойные пользователи Google также запрашивают результаты на разных языках
- Google тестирует увеличенное окно прямой трансляции в результатах поиска
- Google тестирует расширяемые карты в поиске и вкладки в результатах карт (снова)
- Google тестирует больше новых дизайнов дополнительных ссылок
Google Local:
- Google Business Lists Test Интерфейс наложения фотографий в веб-поиске
- Google добавляет «Просмотреть все бизнес-профили» в результатах веб-поиска
- Google добавляет раздел «Продукты» в правила профиля компании
- Локальный спам Google теперь включает дубликаты фотографий, сообщений, видео и логотипов
- Подотзывы: Местные обзоры Google по категориям и атрибутам
- Поиск Google Функция просмотра мест с картами, которые можно перелистывать
- Отменил ли Google политику исключения отзывов Карт?
- Бизнес-профиль Google тестирует подписи к бизнес-фотографиям
- Карты Google: ваш отзыв не опубликован Электронная почта
- Google добавляет азиатский бизнес-атрибут для бизнес-профилей
Google Misc:
- Таймер поиска Google и секундомер снова начали тикать
- Google тестирует новый формат рабочего времени SEO — вам нравится?
Обсуждение на форуме WebmasterWorld.
Admin-Konsole: Einstellungen, Nutzer und Geräte verwalten
Было ли это не в Google Workspace? Bei der digitalen Google Cloud Next ’22 erfahren Sie mehr. WEITERE INFORMATIONEN
Google Workspace для организации verwalten
- Mit Google Admin können Sie ganz uncompliziert Nutzer hinzufügen, Geräte verwalten oder Sicherheitsfunktionen und weitere Einstellungen configurieren, damit Ihre Daten rundum geschützt bleiben. Так erübrigt sich jedes Handbuch für die Verwaltung.
Здравый смысл и контроль
Einrichtung und Verwaltung sind ganz einfach, weil Sie alles an einem Ort
найден. С интегрированными функциями Cloud Identity
können Sie Nutzer verwalten und Sicherheitsoptionen aktivieren, etwa die
Bestätigung в zwei Schritten oder Sicherheitsschlüssel. У себя дома
Sicherheitsanalysen und Empfehlungen aus dem Sicherheitscenter profitieren
Sie von zusätzlichem Schutz.
У себя дома
Sicherheitsanalysen und Empfehlungen aus dem Sicherheitscenter profitieren
Sie von zusätzlichem Schutz.
Endpunktverwaltung
Mit der Endpunktverwaltung können Sie auf beliebigen Endgeräten Apps bereitstellen, die Nutzung überwachen, Sicherheitseinstellungen verwalten und den Zugriff steuern.
Speicherorte für Daten und Zugriffstransparenz
Sie entscheiden, in welchen Regionen Ihre
неактивен Google Workspace-Daten gespeichert werden, und Sie können
dafür sorgen, dass Nutzern auch während der Übertragung von Daten alle
Funktionen zur Verfügung stehen. Außerdem sehen Sie, welche Aktionen
Google-Mitarbeiter im Zusammenhang mit Ihren Daten ausgeführt haben.![]()
Erweitertes Sicherheitsprogramm
Nutzung von Sicherheitsschlüsseln erzwingen Zugriff auf nicht vertrauenswürdige Apps blockieren E-Mails mit erweiterten Scans noch besser vor Bedrohungen schützen Weitere Informationen
Хундерте фон Дриттанбитер-Аппс
Я нашел Google Workspace Marketplace в другом месте. integrierte Lösungen für CRM, Projectmanagement und Compliance. Sie können sich ganz einfach mit Ihren Google Workspace-Datenmelden.
Umfangreiche Erkenntnisse und Berichtsmöglichkeiten
Überwachen Sie die Google Workspace — Nutzung in Ihrem Unternehmen und lassen
Sie sich über verdächtige Aktivitäten informieren. Über Prüffunktionen werden
alle Eingriffe und Änderungen erfasst, sodass Sie eventuellen Problemen genau auf
den Grund gehen können.
Über Prüffunktionen werden
alle Eingriffe und Änderungen erfasst, sodass Sie eventuellen Problemen genau auf
den Grund gehen können.
Мобильное приложение администратора для решения проблем
С приложением Google Admin-App для Android или iOS последнее, что есть в Konto auch unterwegs Вервальтен. Sie können beispielsweise Nutzer hinzufügen, Passwörter zurücksetzen, sich Audit-Logs ansehen und den Support kontaktieren.
Wie melde ich mich bei meiner Admin-Konsole?
Укажите ссылку на admin.google.com на странице Admin-Konsole zugreifen. Melden Sie sich mit Ihrer E-Mail-Adresse und Ihrem Пароль и Admin-Konsole zu öffnen.
Был ли синд Nutzerkonten?
Damit sich ein Nutzer bei Google Workspace anmelden kann, muss ein
Nutzerkonto eingerichtet werden, das ihm einen Namen, ein Passwort und eine
Адрес электронной почты zuweist. Sie können Ihren Nutzern darüber hinaus auch альтернатива
E-Mail-Adressen zuordnen und zusätzliche Konten für Mailinglisten einrichten.
Sie können Ihren Nutzern darüber hinaus auch альтернатива
E-Mail-Adressen zuordnen und zusätzliche Konten für Mailinglisten einrichten.
Kann ich Regionen zur Speicherung von Daten nach Organisationseinheit (OE) Эндерн?
Я. Sie können Ihre Daten nach OE auf verschiedene Regionen verteilen und beliebig из verschieben. Вайтере Информация
Der Einstieg ist ganz einfach
Wenn Sie Unterstützung benötigen, können Sie sich rund um die Uhr an unseren E-Mail-, Чатодер Telefonsupport wenden.
Джецт начатьКонсоль Google Play
Зачем мне нужна общая учетная запись Gmail?
Google взимает плату за регистрацию в Google Play Console в размере 25 долларов США за каждого зарегистрированного пользователя. Наличие общей учетной записи Gmail позволяет большему количеству людей иметь доступ без дополнительных регистрационных сборов.
У меня нет общей учетной записи Gmail.
Вы можете легко создать учетную запись, перейдя на сайт Gmail и выбрав Создать учетную запись.
Что вы подразумеваете под «универсальным» для учетной записи Gmail?
Мы хотим создать учетную запись Gmail, которой могут пользоваться несколько пользователей, или учетную запись, не привязанную ни к одному человеку. Когда сотрудники покидают вашу организацию, этот Gmail должен оставаться в организации. Владелец учетной записи Google Play Console не может передать право собственности другому пользователю Gmail.
Почему мне нужно использовать полное название моей организации в качестве имени разработчика в Google Play?
Есть две причины. Во-первых, это имя, которое будет отображаться в списках ваших приложений в Google Play. Во-вторых, благодаря названию команда разработчиков мобильных приложений находит вас в своем списке приложений, которыми они управляют. Члены команды разработчиков мобильных приложений должны иметь возможность найти в списке «пример школьного округа» вместо «esd».
Для чего используется поле адреса электронной почты при регистрации в Google Play Console?
Сюда будут отправляться уведомления о статусе приложения и маркетинге (если вы решите их получать). Это не отображается в Google Play.
Зачем выбирать «никогда» в качестве даты истечения срока действия доступа в Google Play Console?
Команде разработчиков мобильных приложений потребуется получать доступ к вашей учетной записи несколько раз в год, чтобы доставлять новые двоичные файлы, корректировать информацию о листинге или выполнять другие задачи, которые будут поддерживать соответствие вашего приложения политикам Google Play. Если вы решите истечь срок действия приглашения по истечении определенного периода времени, нам потребуется, чтобы вы отправили новое приглашение в следующий раз, когда нам понадобится доступ.
Почему я предоставляю вам доступ на уровне администратора к моей консоли Google Play?
Этот уровень доступа необходим команде разработчиков мобильных приложений для выполнения своей работы, включая доставку новых версий приложения в магазин и изменение списка приложений. Если в вашей учетной записи есть другие приложения, вы можете ограничить доступ групп мобильных приложений только к одному приложению, сохраняя при этом доступ на уровне администратора.
У нас есть G Suite/Google Domain/Google for Education.
Нет проблем. Просто попросите администратора создать общую учетную запись для регистрации в Google Play Console. Эта общая учетная запись может по-прежнему находиться в том же домене/наборе. Обратите внимание, что для G Suite вам необходимо убедиться, что доступ к консоли Google Play включен. Без этого вы не сможете получить доступ к Google Play Console. Почему общий аккаунт?
Что вы подразумеваете под «правильной» учетной записью Gmail?
Просто это учетная запись Gmail, на которую вы хотите владеть регистрацией Google Play Console. Обратите внимание, что эта учетная запись становится владельцем учетной записи Google Play Console и не может измениться.
Уровни разрешений Google Play Console
Уровень разрешений администратора требуется команде мобильных приложений для управления списком и отправки новых версий в магазин. Однако вы можете ограничить доступ команды разработчиков мобильных приложений только к приложению Blackboard, выбрав приложение в раскрывающемся списке рядом с уровнем разрешений. Обратите внимание, что это невозможно сделать, пока список приложений не появится в вашей учетной записи.
Что такое идентификатор транзакции регистрации в Google Play?
Этот идентификатор в некотором роде является идентификатором вашей учетной записи. Идентификатор транзакции регистрации в Google Play известен под несколькими именами: идентификатор транзакции, номер заказа, Google Play и номер проверки. Это очень большая буквенно-цифровая строка, которая может иметь один из трех различных форматов:
- 012345678
- 456789.токен.012345678
- 45
- 0.Г.12345678
- 45
- регистрация-1234ab56-7c89-12d3-4567-8e567f8
- ПДС.1234-5678-9012-34567
Где я могу найти свой идентификатор транзакции регистрации в Google Play?
Есть четыре способа узнать этот идентификатор.
- Компания Google отправит вам электронное письмо с квитанцией после регистрации учетной записи Google Play Console. В учетной записи Gmail, которая использовалась для регистрации, выполните поиск «плата за регистрацию для разработчиков».
- Перейдите на страницу оплаты Google, выберите «Активность» и найдите «Токен разработчика Google Play».
- Перейдите на страницу оплаты Google, выберите Другие действия по покупке, затем выберите позицию на 25 долларов США.
- Обратитесь в службу поддержки Google Play Console. Если вы предоставите им последние 4 цифры кредитной карты, использованной для совершения покупки, они смогут предоставить этот идентификатор.
Что такое имя разработчика консоли Google Play?
Это название вашей организации, которое вы указали бы при регистрации в Google Play Console. Это имя будет отображаться в списке вашего приложения в Google Play.
Где я могу найти свое имя разработчика консоли Google Play?
Войдите в консоль Google Play и щелкните значок Android в правом верхнем углу. Он будет указан в раскрывающемся списке.
Что такое идентификатор команды разработчиков Apple?
Это идентификатор, связанный с вашей командой разработчиков Apple. Это необходимо для передачи вашего списка приложений вам. Обычно это буквенно-цифровая строка с заглавными буквами, которая выглядит следующим образом: ABCD1EF2G3
Где я могу найти свой идентификатор команды разработчиков Apple? Войдите в Apple Developer, нажмите «Членство» на левой панели и найдите идентификатор команды на странице.
Подключение к Google Cloud Platform
Перечисленные ниже местоположения Google Cloud Interconnect представляют собой объекты совместного размещения, где обеспечиваются межсоединения. Каждое расположение межсоединения поддерживает подмножество регионов Google Cloud Platform (GCP).
| Город | Центр обработки данных | Местоположение | Регион обслуживания |
|---|---|---|---|
| Дубай | Equinix DX1 ; скоро | dxb-zone1-1355 | europe-central2 (Польша) |
| Frankfurt | Equinix Frankfurt West (FR4) | fra-zone1-683 | europe-north2 (Финляндия) |
| Frankfurt | Equinix Frankfurt West (FR4) | fra-zone2-683 | europe-west1 (Бельгия) |
| Лондон | Global Switch (Лондон 2) | lhr-zone2-47 | europe-west2 (Великобритания) |
| Лондон | Эквиникс Лондон Слау (LD5-LD6) | lhr-zone1-832 | europe-west3 (Германия) |
| Марсель | Interxion Marseille (MRS1, MRS2) | mrs-zone1-226 | europe-west4 (Нидерланды) |
| Марсель | Interxion Marseille (MRS1, MRS2) | mrs-zone2-226 | europe-west6 (Цюрих) |
| Милан | Инфраком Милан | mil-zone1-1974 | europe-west4 (Нидерланды) |
| Милан | Инфраком Милан | mil-zone2-1974 | europe-west6 (Цюрих) |
| Стокгольм | Equinix Stockholm Bromma (SK1) | arn-zone1-156 | europe-west8 (Милан) |
| Стокгольм | Equinix Stockholm Bromma (SK1) | arn-zone2-156 | europe-west9 (Париж) |
| Цюрих | Equinix Zh3 | zrh-zone1-81 | europe-southwest1 (Мадрид) |
| Цюрих | Interxion Цюрих / Глаттбругг | zrh-zone2-83 | |
| Сантьяго | Уровень(3) Сантьяго | scl-zone1-1779 | южная Америка-Восток1 (Сан-Паулу) |
| Сантьяго | Уровень(3) Сантьяго | scl-zone2-1779 | us-east1 (Южная Каролина)) |
| Эшберн | Equinix Ashburn (DC1-DC11) | iad-zone1-1 | Northamerica-Northeast1 (Монреаль) |
| Ashburn | Equinix Ashburn (DC1-DC11) | iad-zone1-1 | Northamerica-Northeast1 (Монреаль) |
| Ashburn | Equinix Ashburn (DC1-DC11) | iad-zone2-1 | us-central1 (Айова) |
| Чикаго | Эквиникс Чикаго (канал 2/канал 3/канал 5) | ord-zone1-7 | us-west1 (Орегон) |
| Чикаго | Эквиникс Чикаго (канал 2/канал 3/канал 5) | ord-zone2-7 | us-west2 (Лос-Анджелес) |
| Даллас | Эквиникс Даллас (DA1) | dfw-zone1-4 | us-west3 (Солт-Лейк-Сити) |
| Даллас | Эквиникс Даллас (DA1) | dfw-zone2-4 | us-west4 (Лас-Вегас) |
| Торонто | Скоро | северная Америка-северо-восток2 (Торонто) | |
| Лос-Анджелес | Эквиникс Лос-Анджелес (LA1) | lax-zone1-8 | |
| Лос-Анджелес | CoreSite — LA1 — One Wilshire | lax-zone2-19 | |
| Майами | Equinix Майами (MI1) | mia-zone1-15 | |
| Майами | Equinix Майами (MI1) | mia-zone2-15 | |
| Монреаль | Cologix MTL3 | yul-zone1-1944 | |
| Монреаль | Cologix MTL3 | yul-zone2-1944 | |
| Нью-Йорк | Цифровая недвижимость | Telx New York (111 8th Ave) | lga-zone2-16 | |
| Нью-Йорк | zColo Нью-Йорк — 60 Hudson St | lga-zone1-1422 | |
| Сан-Хосе | Эквиникс Сан-Хосе (SV1/5) | sjc-zone1-6 | |
| Сан-Хосе | Эквиникс Сан-Хосе (SV1/5) | sjc-zone2-6 | |
| Сиэтл | Эквиникс Сиэтл (SE2/3) | морская зона 1-86 | |
| Сиэтл | Эквиникс Сиэтл (SE2/3) | морская зона2-86 | |
| Гонконг | Equinix Гонконг (HK2) | hkg-zone2-1118 | asia-east1 (Тайвань) |
| Гонконг | MEGA-i (iAdvantage Гонконг) | hkg-zone1-225 | азия-восток2 (Гонконг) |
| Осака | Equinix Осака (OS1) | kix-zone1-1791 | asia-northeast2 (Осака) |
| Осака | Equinix Osaka (OS1) | kix-zone2-1791 | asia-northeast3 (Сеул) |
| Сингапур | Global Switch Сингапур | sin-zone1-388 | asia-southeast1 (Сингапур) |
| Сингапур | Equinix Singapore (SG3) | sin-zone2-2260 | asia-southeast2 (Джакарта) |
| Тайбэй | Главное здание LY Тайбэй | tsa-zone1-456 | |
| Тайбэй | Главный LY Building Тайбэй | tsa-zone2-456 | |
| Токио | Эквиникс Токио (TY2) | nrt-zone1-452 | |
| Токио | AT TOKYO CC2 | nrt-zone2-738 | |
| Сеул | KINX Гасан | icn-zone1-7674 | |
| Сеул | KINX Гасан | icn-zone2-7674 | |
| Сидней | NEXTDC S1 | syd-zone1-1660 | australia-southeast1 (Сидней) |
| Сидней | Эквиникс Сидней (SY3) | syd-zone2-1605 | |
| Брисбен | NEXTDC B2 | bne-zone1-4688 | |
| Брисбен | NEXTDC B2 | bne-zone2-4688 |
Как настроить Google Search Console! – Простое начало работы
Как настроить Google Search Console! Простое начало работы
Сегодня мы покажем вам, как настроить Google Search Console менее чем за 3 минуты.
Начать работу с Search Console очень просто. Это бесплатно. И есть куча способов настроить его, в зависимости от того, что лучше всего подходит для вас.
Google уже предоставляет пошаговое руководство по настройке Search Console и подтверждению вашего сайта. Но, честно говоря, это скучно, многословно и резко для глаз. Поэтому мы собираемся дать более удобное руководство. Поверьте, это единственное руководство, которое вам когда-либо понадобится, чтобы правильно настроить Google Search Console.
Итак, приступим.
Зачем использовать Search Console?
Google Search Console (или GSC) — один из самых, если не самый мощный инструмент SEO.
Но почему это важно? По своей сути Search Console помогает вам отслеживать, поддерживать и оптимизировать присутствие вашего веб-сайта в органическом поиске. Большинство в основном используют GSC для просмотра кликов и показов. Хотя это круто, он может предложить гораздо больше. Например, это может:
- Найдите поисковые запросы, которые привлекают трафик
- Узнайте, насколько хорошо все ваши страницы ранжируются
- Определите и используйте обратные ссылки для увеличения ссылочного веса
- Добавьте карты сайта
- Найдите ошибки, которые необходимо исправить
- Убедитесь, что вы соответствуете требованиям для расширенных фрагментов и схемы
- Сделайте свой сайт более удобным для мобильных устройств
- Отслеживайте основные веб-показатели
- Покажите, был ли ваш сайт взломан
И мы упоминали, что это бесплатно?
Чтобы узнать больше о преимуществах GSC, ознакомьтесь со всеми замечательными вещами, которые Search Console может сделать для вас.
Как настроить учетную запись Search Console
Шаг 1: Войдите в Search Console с помощью своей учетной записи Google.Примечание. Чтобы этот метод работал, вам потребуется учетная запись Google при настройке Search Console. Не волнуйтесь, это тоже бесплатно. Если у вас уже есть Google Analytics, Adwords или Gmail, вы можете использовать тот же логин.
Шаг 2: Введите домен вашего веб-сайта (или префикс URL), чтобы добавить свойство.После входа в систему у вас есть возможность добавить тип свойства через свой домен или префикс URL.
Мы рекомендуем настроить Google Search Console с использованием домена.
Вот почему, начнем с некоторых ключевых определений:
- Свойство — общий термин для отдельного веб-сайта, URL-адреса, мобильного приложения или устройства с uniroot-каталогом (он же public_html) вашего идентификатора отслеживания Siteque
- Домен — имя вашего веб-сайта (без http(s):// и www. ). Наш домен — raddinteractive.com
- Субдомен — к домену добавлено расширение, например www .raddinteractive.com или магазин .raddinteractive.com
- URL – адрес веб-страницы. (Домен — это имя сайта; URL-адрес ведет на страницу этого сайта)
- Префикс URL-адреса — протокол, который появляется перед вашим доменом. Например, http:// или https://
При настройке Search Console с помощью параметра «Домен» ваша учетная запись настраивается как свойство на уровне домена.
Это означает, что вы создаете единый ресурс, включающий все субдомены и префиксы протоколов, связанные с вашим доменом. Другими словами, эта опция подключает Google Search Console ко всем аспектам вашего сайта.
Итак, вот следующий шаг по настройке Google Search Console со свойством на уровне домена. Введите корневой домен вашего сайта в поле ввода и нажмите «Продолжить».
Выбор «URL-prefix» устанавливает свойство URL-prefix .
Это означает, что вы создаете одно свойство только для одного префикса URL вашего сайта. Таким образом, Search Console будет подключена только к одной версии вашего сайта, а не ко всем протоколам/субдоменам, поэтому она может не предоставлять точных данных. Но иногда у вас нет другого выбора, кроме как использовать URL-префикс.
Чтобы настроить свойство префикса URL, введите URL-адрес с префиксом в поле и нажмите «Продолжить».
ПРИМЕЧАНИЕ : Чтобы Search Console предоставлял точные данные со свойствами префикса URL, создайте свойство GSC для каждого из следующих четырех URL:
- https://yourdomain.com
- http://yourdomain.com
- https://www.yourdomain.com
- 9 9002 http://www.yourdomain1.com0285
Если вы используете другие поддомены, например blog.
Шаг 3: Подтвердите свой веб-сайт yourdomain.com или shop.yourdomain.com , вам также нужно создать свойство для каждого из них. В общем, вам придется повторить весь процесс настройки Google Search Console для каждого из этих URL-адресов.Чтобы внедрить Google Search Console и начать сбор данных, вам необходимо подтвердить, что вы являетесь владельцем своего сайта. Процесс проверки зависит от того, какой вариант вы выбрали на предыдущем шаге.
Перейти к инструкциям, которые относятся к вам:
- Проверка свойства домена
- Проверка свойства префикса URL
Существует только один способ проверить свойство на уровне домена — через поставщика DNS (или поставщика системы доменных имен). Вот экран, с которого вы начнете.
Сначала проверьте, можете ли вы найти своего DNS-провайдера (компанию, которой вы платите за использование своего домена) в раскрывающемся списке:
Отобразятся подробные инструкции для вашего провайдера.
Если вы хотите узнать, как внедрить Google Search Console для своей стратегии цифрового маркетинга, используя этот метод, вы можете поработать либо со своим разработчиком, либо с поставщиком DNS. Если вы не видите своего провайдера, вы можете оставить его как « Любой поставщик услуг DNS ».Затем нажмите кнопку «Копировать», чтобы скопировать запись TXT, предоставленную вам Google.
После того, как вы скопировали запись TXT, откройте сайт вашего регистратора домена в новой вкладке (например, GoDaddy, BlueHost, Hostgator и т. д.) и войдите в свою учетную запись с их помощью.
Перейдите к списку доменов, которыми вы владеете, и выберите тот, который хотите настроить. Найдите возможность управлять своими записями DNS. Это будет расположено в разных местах, в зависимости от сайта вашего провайдера. Найдите любое упоминание о «DNS» и щелкните по нему.
Например, на GoDaddy вы должны перейти в « Моя учетная запись > Мои продукты » и выбрать «DNS» рядом с вашим доменом.
Затем вы попадете на экран управления доменом, где найдете список своих DNS-записей. Выберите «Добавить», чтобы создать новый.
Выберите «Тип», выберите TXT. В разделе «Хост» введите символ @. Оставьте «TTL» на 1 час. И, самое главное, вставьте полученную от Google запись TXT в поле «Значение TXT». Затем нажмите «Сохранить».
Это добавит новую запись TXT для Google Search Console. (Если вам интересно, запись TXT используется для предоставления информации о вашем домене внешнему источнику — например, показать Google, что вы являетесь владельцем домена.)
Процесс, который мы только что описали выше для GoDaddy, очень похож для всех поставщиков доменов. Вы даже можете использовать одни и те же записи для «Тип», «Имя хоста» и «TTL». Некоторые провайдеры запрашивают «TXT Record» вместо «TXT Value».
После добавления записи TXT вернитесь к настройкам Google Search Console и выберите «Подтвердить».
Если все прошло по плану, вы должны увидеть такое сообщение:
Имейте в виду, что обновление записей DNS может занять до 72 часов.
Если ваше право собственности не подтверждено сразу, вернитесь через несколько часов или на следующий день и проверьте еще раз.Если это по-прежнему не работает и вам нужна помощь в подтверждении вашего домена, свяжитесь с нами. Мы рады помочь.
Проверка префикса URL-адреса свойстваЕсли у вас нет доступа к вашему регистратору или вы не хотите возиться со своими записями DNS, вы можете настроить Google Search Console, используя свойство URL-prefix. Это предоставляет ряд альтернативных вариантов проверки.
Google рекомендует выполнять проверку с помощью HTML-файла. (Но помните, это только для свойств с префиксом URL. В конечном счете, они рекомендуют вам создать свойство домена, если это возможно.)
Обратите внимание, что существует возможность проверки через поставщика доменных имен. Мы показали, как это сделать выше. Но если вы планируете использовать этот метод, вы также можете создать свойство на уровне домена.
Вот как проверить другими способами.
HTML-файлДля этого метода вам необходимо загрузить файл HTML в корневую папку вашего сайта. Это легко сделать, но недостатком является то, что вам потребуется доступ к вашему серверу либо через FTP, либо через файловый менеджер cPanel. Если вы не знакомы ни с одним из них, не пытайтесь проверить этот метод.
Если вам удобно работать с сервером вашего сайта, вот как вы можете подтвердить это с помощью HTML-файла:
- Загрузите файл, предоставленный Google. (Щелкнув окно загрузки, показанное на изображении выше.)
- Получите доступ к корневому каталогу (также известному как public_html) вашего сайта.
- Загрузить файл. (Как показано на примере изображения, как файл будет выглядеть ниже)
- Вернитесь в Search Console и выберите «Подтвердить»
Для проверки с помощью HTML-тега необходимо добавить метатег в раздел вашего сайта. Для этого вам потребуется доступ разработчика к CMS вашего сайта.
Мы будем использовать WordPress в качестве примера.Используя WordPress, вы можете сделать это двумя способами:
- Добавление метатега непосредственно в файл header.php
- Использование плагина для добавления в заголовок
Скорее всего, вы выберете второй вариант. Потому что, если вам удобно работать с header.php, вам лучше проверить через файл HTML.
Вот шаги, чтобы добавить HTML-тег GSC в WordPress с помощью плагина:
- Скопируйте тег.
- Войдите в панель администратора WordPress на новой вкладке.
- Установите плагин «Вставить верхние и нижние колонтитулы» на свой сайт.
- Перейдите в Настройки>Вставить верхние и нижние колонтитулы .
- После метатега Search Console в поле «Скрипты в заголовке » .
- Вернитесь в Search Console и выберите «Подтвердить»
Если у вас есть учетная запись Google Analytics и вы установили код отслеживания на свой сайт, вы можете выполнить шаги по началу работы с Google Search Console, подтвердив там свойство префикса пользователя.
Просто откройте окно подтверждения Google Analytics в Search Console, как показано ниже….… и нажмите «Подтвердить».
Чтобы это работало, убедитесь, что вы выбрали права «редактировать» в Google Analytics для элемента, код отслеживания которого используется этим ресурсом. Если вы еще не добавили код отслеживания Google Analytics — например, analytics.js или gtag.js — на свой сайт, вам необходимо сделать это в первую очередь.
Диспетчер тегов GoogleПодобно методу проверки Google Analytics, если вы уже используете Диспетчер тегов Google, вы можете подтвердить это одним щелчком мыши.
Откройте окно подтверждения Google Tag в Google Search Console…
….и нажмите «Подтвердить».
Чтобы это работало, у вас должен быть установлен фрагмент Диспетчера тегов на вашем сайте И иметь разрешения для Диспетчера тегов, установленные на «Публикация».
Дополнительные настройки Google Search Console
Существуют и другие способы создания учетной записи Google Search Console в зависимости от вашей CMS.
К ним относятся:- WordPress
- Блоггер
- Сайты Google
Выше мы показали, как проверить Search Console на WordPress с помощью тега HTML и плагина заголовка. Но вы также можете проверить это с помощью своего SEO-плагина WordPress. Двумя самыми популярными SEO-плагинами являются Yoast SEO и All-in-One SEO.
Вот как настроить Google Search Console для каждого из них:
- Создайте учетную запись GSC и добавьте свойство префикса URL (как показано в шагах 1 и 2 выше).
- Скопируйте предоставленный тег HTML.
- Для Yoast SEO: на панели инструментов WordPress перейдите в SEO>Общие . Выберите вкладку «Инструменты для веб-мастеров». Вставьте свой HTML-тег в поле для кода подтверждения Google. Нажмите «Сохранить изменения». (Как показано на первом изображении ниже.)
- Для все-в-одном SEO: в панели инструментов WordPress выберите All-in-One SEO>Общие настройки . Вставьте свой HTML-тег в поле для инструментов Google для веб-мастеров (так раньше называлась Search Console). Затем нажмите «Обновить». (Как показано на втором изображении ниже.)
- Примечание. Yoast и All-in-One автоматически удалит код, поэтому после сохранения будет отображаться только идентификатор тега.
- Вернитесь в Google Search Console и выберите «Подтвердить».
Внедрить GSC в BloggerВсе новые блоги, созданные в Blogger, автоматически проверяются в вашей учетной записи Search Console. (Если вы входите в Search Console с той же учетной записью, которая используется для управления вашей учетной записью Blogger.)
Если у вас более старая учетная запись Blogger, вы можете настроить Search Console с помощью тега HTML, как показано выше.
Внедрение GSC на Сайтах GoogleЕсли вы используете новый сайт Google (все, что было создано после 2016 года), подтвердите его с помощью метода Google Analytics, описанного выше.
Если вы используете классический сайт Google (все, что было создано до 2016 года) ИЛИ у вас есть сайт Google с URL-адресом личного домена (например, отличным от sites.google.com ), используйте метод тега HTML.
Следующие шаги: отправка вашего сайта
И что теперь?
Начало работы с Google Search Console также означает знакомство с отчетами и инструментом отправки карт сайта. Теперь вы знаете, как внедрить Google Search Console для своего веб-сайта. Конечно, если один из этих методов вам не подходит или вам нужна помощь в настройке GSC, мы можем вам помочь.
После того, как вы настроили свою учетную запись и подтвердили свой веб-сайт, вы можете задаться вопросом: «Как я могу добавить свою компанию в результаты поиска Google?»
К счастью, это очень просто.
После завершения настройки следующим шагом будет отправка карты сайта в GSC.
Отправка вашей XML-карты сайта является ключевым фактором ранжирования для SEO, поэтому вам определенно нужно убедиться, что вы сделали это правильно. Чтобы убедиться, что вы это сделаете, вот пошаговое руководство о том, как добавить карту сайта в Google Search Console.
Обычно карту сайта можно найти, добавив «/sitemap.xml» в конец домена и открыв файл в браузере. Если это не сработает, вам может потребоваться проверить настройки вашей системы управления контентом (CMS), чтобы узнать, создает ли она для вас карту сайта. Вы также можете проверить свой файл «robots.txt», чтобы увидеть, указан ли он там.
В Search Console перейдите к Sitemaps в меню слева. Здесь вы можете добавить URI для местоположения вашей карты сайта. Google может немедленно принять к сведению отправленные URL-адреса, и через несколько дней ваши URL-адреса должны быть в основном просканированы и проиндексированы!
Узнать больше
Свяжитесь с нами, чтобы узнать больше о ресурсах и стратегиях улучшения технического SEO.
Заполните форму ниже, чтобы связаться с нами или быть в курсе будущих сообщений в блоге.Часть 4/16: Настройка: Google Search Console | SEO-тренинг для начинающих от Casandra Campbell
Перейти к содержимому
Курсы
SEO-тренинг для начинающих
Настройка: Google Search Console
SEO-тренинг для начинающих
Создайте бизнес, пока вы учитесь
Попробуйте Shopify бесплатно в течение 14 дней, кредитная карта не требуется.
Начать бесплатную пробную версию Shopify
Содержание курса (16 уроков)
Обзор
Введение2:14
Что такое SEO?1:53
3 Преимущества SEO3:00
03 9Настройка: Google Search Console4:46
Настройка: Google Analytics3:10
Глоссарий и рекомендации по инструментам1:00
02 | Исследование ключевых слов
Что такое исследование ключевых слов? 4:03
Как проводить исследование ключевых слов 6:25
Демонстрация: исследование ключевых слов для магазина Shopify Поисковая оптимизация сайта?3:32
Оптимизация внутреннего SEO с помощью ключевых слов9:20
Демонстрация: внутреннее SEO для магазина Shopify3:29
04 |Внешнее SEO
Что такое внешнее SEO?2: 12
4 Повторяемые стратегии внешнего SEO6:22
Демонстрация: исследование линкбилдинга4:03
Заключение: 4 навыка для долгосрочного успеха SEO2:49
Обзор
Введение2:14
Что такое SEO?1:53
3 Преимущества SEO3:00
01 |Настройка SEO28 Up: Google Search Console4:46Настройка: Google Analytics3:10
Глоссарий и рекомендации по инструментам1:00
02 |Исследование ключевых слов
Что такое исследование ключевых слов?4:03
Как проводить исследование ключевых слов6:25
Демонстрация: исследование ключевых слов для магазина Shopify4:25
03 |Внутреннее SEO
Что такое внутреннее SEO?3:32
Оптимизация внутреннего SEO с помощью ключевых слов9:20
Демонстрация: внутреннее SEO для магазина Shopify3:29
04 |Выкл.
-Site SEOЧто такое внешнее SEO?2:12
4 Повторяемые стратегии для внешнего SEO6:22
Демонстрация: исследование линкбилдинга4:03
Вывод: 4 навыка для долгосрочного успеха SEO2:49
Добро пожаловать в Модуль 2!
Этот модуль поможет вам настроиться на долгосрочный рост.
К концу этого модуля вы сможете настроить Google Search Console и Google Analytics.
Для начала вы узнаете, как настроить Google Search Console. Имейте в виду, что одним из шагов является проверка URL-адреса вашего веб-сайта. На этом этапе вам необходимо убедиться, что ваша страница с паролем в магазине Shopify деактивирована, чтобы Google мог правильно проверить сайт. После завершения процесса проверки вы можете повторно активировать страницу пароля, пока не будете готовы к запуску.
💡Консоль поиска Google поможет вам измерить поисковый трафик и производительность вашего сайта, устранить проблемы и сделать ваш сайт ярче в результатах поиска.
Если вы уже настроили это, вы можете перейти к следующему модулю.
Инструменты, упомянутые в видео:
- Создайте учетную запись Gmail. Вы можете использовать корпоративную электронную почту или личную учетную запись Gmail.
- Зарегистрируйтесь в Google Search Console
- Три раздела, на которые следует обратить внимание при запуске, включают: производительность, покрытие и ссылки (в левой части навигации).
[ВОСПРОИЗВЕДЕНИЕ МУЗЫКИ] Этот модуль предназначен исключительно для того, чтобы помочь вам настроиться на успех и долгосрочный рост. Итак, для начала, я думаю, что все должны сделать прямо сейчас, это настроить Google Search Console. Google Search Console — один из самых недооцененных бесплатных инструментов для вашей SEO-стратегии. Search Console — это, по сути, способ для вас и Google общаться друг с другом.
Когда вы настроите Search Console, они начнут собирать для вас данные поисковой аналитики.
Но он не начнет записывать эти данные до того дня, когда вы его настроите. Поэтому, если вы не настроите его сразу, и вы, и Google будете действовать вслепую. Google должен угадать, что вы делаете, и не предупредит вас, если с вашим сайтом что-то не так. Некоторые из вещей, которые вы можете использовать для Search Console, включают в себя просмотр веб-сайтов, которые ссылаются на вас.Это важный фактор ранжирования в органическом поиске. Вы также сможете увидеть, по каким ключевым словам вы уже ранжируетесь, включая вашу среднюю позицию в этих результатах поиска. Search Console также будет отправлять оповещения, если Google обнаружит проблему с вашим сайтом. Итак, давайте сложим это вместе. Если вы прошли наш онлайн-курс по дизайну, возможно, вы уже знакомы с theneutralist.com. Мы собираемся использовать этот магазин для демонстрации многих концепций, которые мы рассмотрим в этом курсе.
ОК. Перед настройкой Search Console вам потребуется магазин Shopify, купить доменное имя и адрес электронной почты для вашего бизнеса.
Если вам нужна помощь, перейдите по ссылке в разделе Ресурсы. Я использую theneutralist.com. Как только вы окажетесь в Google Search Console, нажмите «Начать сейчас», чтобы приступить к работе.Вам будет предложено войти в свою учетную запись Google. ХОРОШО. Итак, мы в Google Search Console. Первое, что вам нужно сделать, это добавить свой URL. Я рекомендую скопировать и вставить ваш URL-адрес с вашего веб-сайта, чтобы убедиться, что у вас правильная версия. Иногда ваш веб-сайт может иметь несколько версий, включая версию с www и версию без www. Копируя и вставляя, вы всегда будете иметь правильный.
ОК. После добавления URL-адреса вам будет предложено подтвердить свой веб-сайт. Этот шаг важен для того, чтобы Google мог убедиться, что это действительно ваш веб-сайт или веб-сайт, к которому у вас есть доступ. Я собираюсь использовать первый вариант проверки, называемый тегом HTML. Для этого все, что вам нужно сделать, это скопировать и вставить тег и добавить его на свой сайт.
Итак, как только я окажусь в своем магазине Shopify, я перейду в Интернет-магазин и затем нажму «Темы».Оттуда я нажму «Редактировать код» в меню «Действия». Следующим шагом является нажатие на Theme.Liquid. Обычно это будет вверху в разделе «Макет». Если вы никогда раньше не видели никакого кода, не паникуйте. Я собираюсь поговорить с вами об этом. Здесь много чего происходит, но все, что вам нужно найти, это закрывающий тег head. Вот здесь вы видите скобку, обратную косую черту, слово «голова», а затем еще одну скобку.
Прямо над этим тегом вставьте код, который вы скопировали из Search Console. Затем нажмите Сохранить. Вот и все. Вернемся к Search Console. Теперь, когда я добавил код на свой веб-сайт, я нажму «Подтвердить». И, похоже, мы готовы идти.
Поскольку мы только что настроили Google Search Console, у нас пока нет данных. Пока мы продолжаем работать над оставшейся частью нашей поисковой оптимизации, Google начнет собирать данные, и мы вернемся и изучим их, когда будем готовы.